} -->

Sunday, 23 April 2017

Classroom Tour 2017


So this year I am in a classroom that was built in the late 1960's. It is very hard to make an old room look good but I have tried my best! Today I am going to take you on a tour of my classroom- cupboards and all!

My classroom is in a cluster of three classrooms which are divided by concertina dividers. I don't technically have a front door, I just have an entry way. My classroom also has some unusual features which I will show you as we go through. The upside to my room is that it is the biggest in the whole school and has stacks of storage. 

So let me first show you a quick overview of the room.


So here we are look back on the entry. Yes, the gap between the cupboard and the bulletin board is my entry way..... I have a welcome sign hanging above the entry which says goodbye on the back.
Get it here: Welcome Banner and Class Rule
This bookshelf has all my maths resources on it. They all belong to the school. 
 To the right of that is my storage cupboard. I have mostly filled it with things left in the room by previous teachers (I've thrown out a lot but you have to be careful you don't get rid of anything someones going to come looking for or the next teacher may actually use). Other than that I store all the recyclables students bring in for making things.
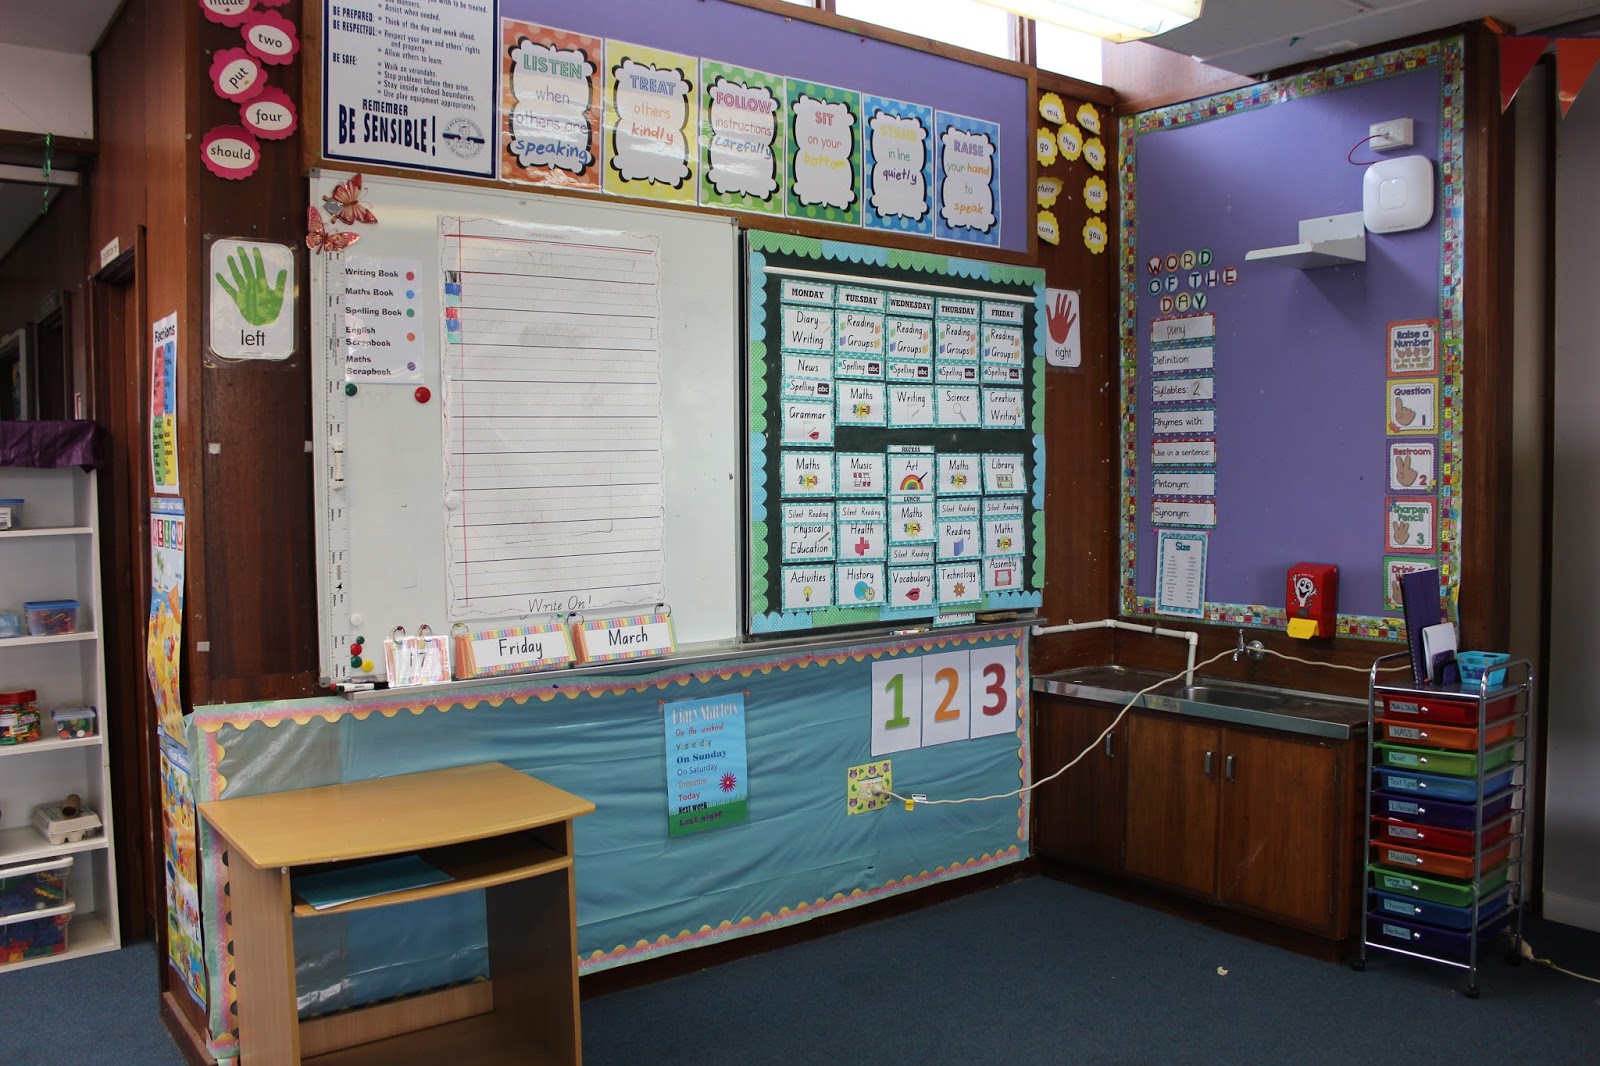
This is what I call 'the front' of my room as it has my main whiteboard.


At the top of the whiteboard are our classroom rules. The students I and I 'crafted' them together. I find students come after with pretty much the same rules year after year so I reuse these posters.
You can find them here: Classroom Rules

Next to my whiteboard is my weekly timetable. I love having this on display for the students, parents and I to refer to. We change particular items if needed each week but generally every week is the same.
You can get my timetable here: Weekly Timetable

The blackboard section flips open and on the inside I have my Reading Group Timetable. They are just laminated pieces of paper that I write on with whiteboard marker so I can change them easily when ever needed.

Next to that I have a sink. I LOVE having a sink in my room. So handy!

Above it I have my Vocabulary Word of the Day display. 
Get this display here: Vocabulary Display


I think this is a staple in just about every teacher's classroom. I use mine to store the photocopies and other smaller resources for lesson. Each drawer lines up with a subject on my timetable. I prefer these draws as I sometimes copy a whole terms work for a particular subject in advance and this gives me room to store it all. It's also easier for relief teachers to find things. On top of this I have my planning file filled with my weekly time tables. In the container are the WTW set for that week.

This is my mat area. I can't seem to get the layout of this section right yet. I have a T.V. screen in the background that I use at least once a day to display things on as well as using the movable white board with the stationery whiteboard being to the left of this. I would like students to be able to view all three from their desk when needed but it is hard to to lay that all out.
On the bottom shelf of the whiteboard I keep the schools reward system. On the top shelf I have the big books for that week and any additional resources I need handy for that day that don't fit in the draws.
Photos never seem to do my chairs justice but my mum and I covered them over the Summer holidays and they look awesome!


Behind my whiteboard I have a rainbow bunting I made myself from card which I cut and laminated then hung on string. This is 3 years old now (4 if you count the year in storage) and it's not showing any sign of wear.

Beneath that is my Write any Number Display and pencils display the names of common Colours and the Days of the Week.

Under that I have my word wall. Each coloured poster has one of my Alphabet Posters that I printed in B4 size and stuck in the corner. Then I have written the words in whiteboard marker that students came up with. 

I have four different colours of student chairs in my room (not by choice). I decided to stack them in their colours for more than just the reason of it looking pretty. I decided it would prevent students having issues getting a chair each morning and automatically ensures chair stacks never get too high. It does mean some students cross the whole room to stack a chair but it hasn't caused any issues yet.

I then have my Birthday Balloons. I love that I can put these in any sized space and it will fit. Spread them out more to fill a bigger space or overlap them to fit a smaller space.

You can see they are on my far corner next to my chimney. Wait, what? I have a chimney in my class! Yep!
It's not used for anything anymore so I wrapped it up in some orange material that was left behind in the classroom. I have a Spelling Poster (FREEBIE) and a Vowels Poster next to that.


Unfortuantly I do not have good enough camera skills to do this view justice. This is the back of my classroom where I have sheer rainbow curtains. 

Beneath the rainbow curtains I have my home readers (conveniently supplied in rainbow tubs by the school) and beneath that is shelving containing various paper and books. 

To the right of that I have my student draws. They keep their scrapbooks, spare supplies and other miscellaneous items here. On top are the pencil tins that some students choose to use over pencil tins. Unfortunately pencil tins are popular with the other teachers and are therefore on our book list. I give students the choice of what to use so parents don't feel they decorated a tin for nothing. As the year progresses I eventually persuade them all to move to pencil cases.  Pencil tins have their upsides but I find them more of a nuisance. 

This year I choose to use my Pencil Labels to label items in my classroom including these trays. 

Off to the right back side of my classroom is a alcove which is lined with cupboards. I am lucky that the second last teacher to have this room painted a lot of the bulletin boards purple! Which just so happens to be my favourite colour! I eventually plan to put up my Text Type Displays as we cover each text type during the year.

As this alcove helps muffle noise a little, I keep the things my students can use during free time here. On top we have our art shirts. I also have a desk around their in case I ever need a student to work in solitude or with another adult.

On top of the built in shelves I store things that won't fit in the cupboards such as our assembly mats, a large set of class whiteboards and all my tubs that store my laminated activities. 

I have also chucked a filing cabinet and a chair I do not use around here. 

On the other side of that alcove is the teacher area. It has a built in desk that I do not use. I am still trying to think of an alternate use for it. 

I also have another teachers desk that I don't really use. 
 I have letters on top of this desk that spell out my last name. I decorated it with washi tape. I also keep my pens there, my assessment files and my mastery folders. 
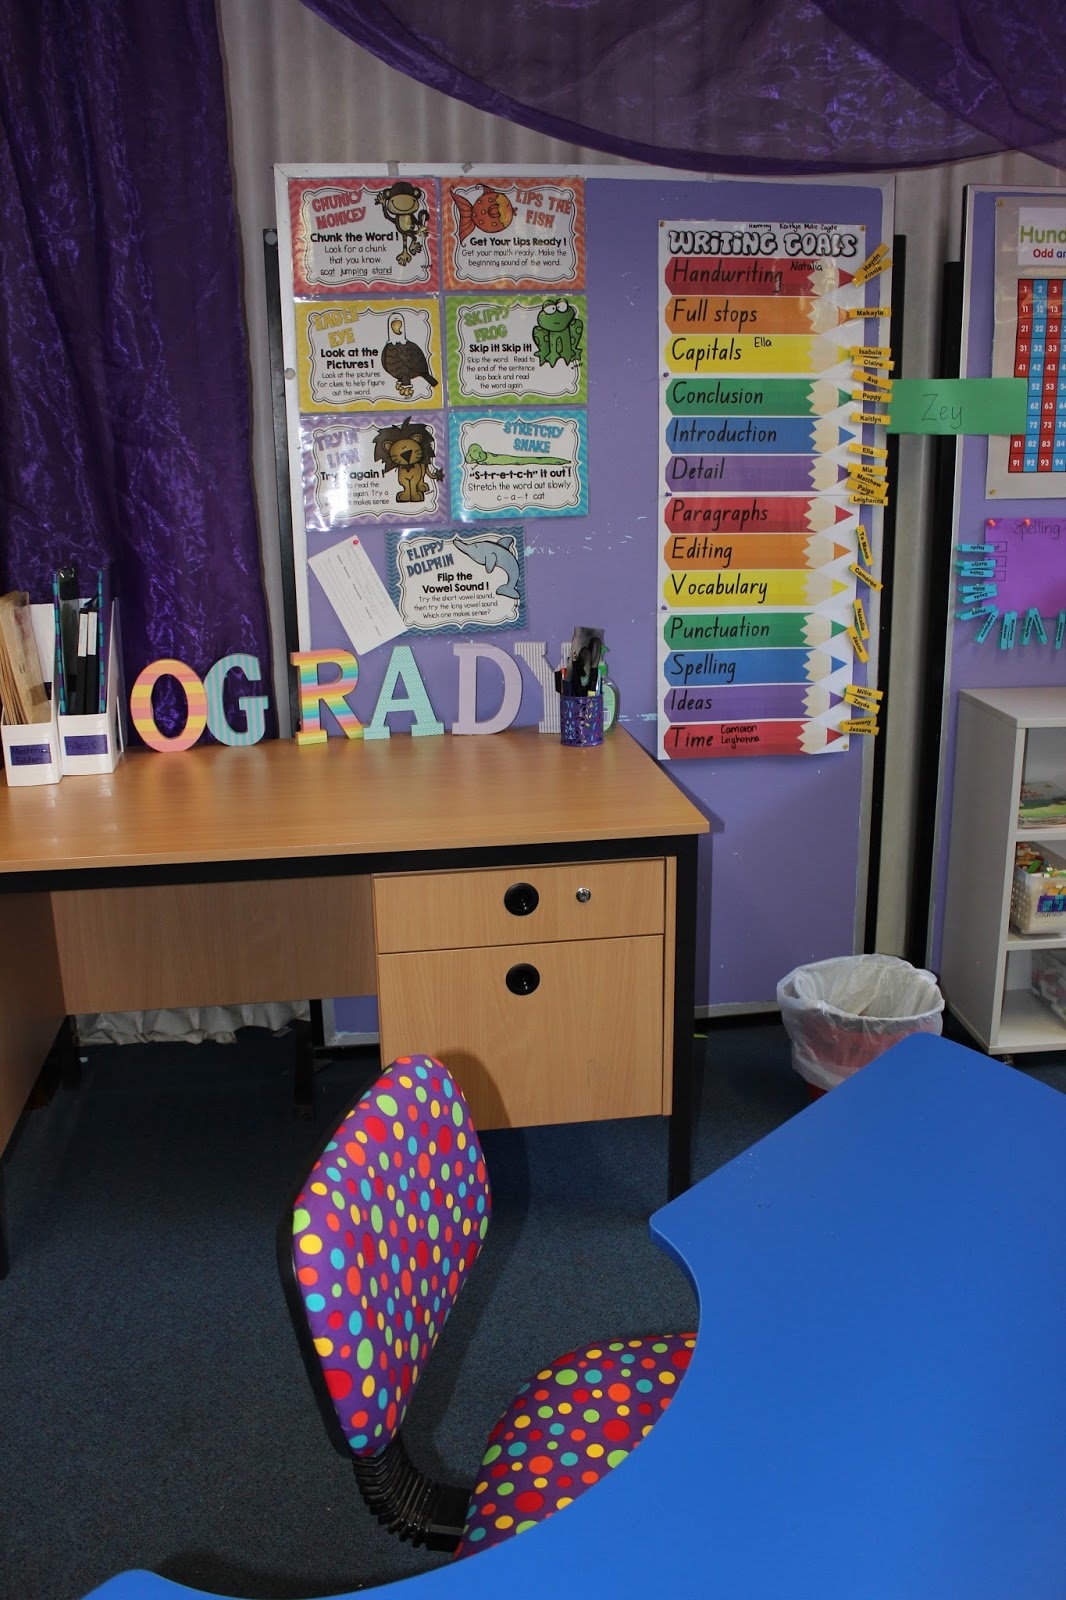

Behind the teachers desk I have Reading Posters by Nicole Blunt and my Writing Goals Chart (FREEBIE)
In this corner I have my horseshoe desk. IT IS MY FAVOURITE PIECE OF FURNITURE EVER!!! If I didn't have one of these in my classroom I was actually going to buy myself one. They have changed the way I work but I might do a separate post on that another day. 

Below the built in teachers desk is this little shelving unit. I use to store all my note templates, late notes and absentee notes.
Above the desk I have a stack of trays for work to be finished by individual studets, work for marking, and work for gluing. I also have a tray for work still in progress as a whole class, my stationary and above that bulk student supplies like headphones, highlighters and clip boards. 
Displayed above that are my Punctuation Posters. 

In my cupboard I have my files including a file of all my Templates, school information and units and a few text books. I also have all my Words Their Way supplies and back up stationary. Behind the cupboard wall I have the DOTT timetable, my timetable and duty roster. 


To the other side of desk is my reading group resources including whiteboards, books and novelties. You can read more about how I approach guided reading here. 

Next up I have a very large, old map storage draw. In it is some large coloured card and I use the top of it to store projects and layout resources for students to collect. Then I have my book shelf.

Above the book shelf I have my current reward system and my Job Wheel.

Coming back around to the entrance to my classroom is a set of draws I use for my Spelling Lists.  You can read more about my spelling approach here. 


Here's a look inside some of my cupboards. Here I have my coloured card. I use a 5 draw system to store my A4 card. It helps keep the paper in nice shape and easy to access. 


This cupboard has tissue boxes, snap lock bags and PVA glue. 

Here is a look inside the containers where I store my laminated activities. 

This is my prize box. I use to have it in an actually box but it always became too messy and students would take forever selecting a prize. Having it sorted like this makes it much more convenient. I get most of prizes from ebay by searching for 'bulk toys'. 

 At the end of term 1 our carpets were being cleaned so I had to move the majority of the furniture out and have plans to try a different layout when I put it all back. I am forever changing the layout of my classroom. It keeps things interesting!
That brings us to the end of my classroom tour. I hope you picked up a few useful ideas along the way!

Like us on Facebook Follow us on Pinterest

Monday, 20 March 2017

How I Plan a Unit

This week I am on the mission of completing another HASS unit so I thought I would take you on my journey of how I create a complete unit.

The first step I take is looking at the curriculum. Usually I divide the curriculum for each subject/area into 4 groups so I have a unit for each term. I use my curriculum checklists and cut up the aspects.
(Find my Curriculum Checklists for F-6 in my store).


Once I am happy with the groupings I choose one that either I am most motivated about or the one that makes sense to be first. Maybe it runs into other aspects or involves prior knowledge or is just an easier topic to cover in first term. I take the aspects and write them down in a brainstorm and from their add points from the elaborations (available on the Australian Curriculum website).


As ideas for lessons and the flow of the planner start coming I start adding numbers to represent the ten lessons I plan around. Sometimes this means that I start a new brainstorm to allow enough room for the planning. There is usually a bit of crossing out and arrows drawn from one side of the page till the other until all the tweaking is done and I am happy to move on. I find ideas come to me fairly naturally but you might like to look around the internet and Pinterest for ideas and activities on how to teach different concepts.


I then start working in my planning document. I add the title, year level, summary and copy in the aspects. The next thing I tackle is the lesson focus. I write down the main the students are doing or learning in each lesson. Sometimes by defining the focus I realise I need to move things around again or that a particular activity I wanted to do doesn't really work for the unit then i'll go back to the brainstorm until I am happy again. I always work with a template from a similar unit I have done so all the formatting is done and I can keep them consistent. I highlight anything still remaining from the template planner yellow so I don't miss anything. I often will refer to a list of verbs for objects such as this one during this process.


Then I go through an start writing in what ideas I already have for each lesson. If I already know exactly what is going to happen in the lesson I will plan it out fully including filling in the resources and assessment column although the wording may not be as clear or succinct as I would like.
If I don't know exactly how the lesson will play out or need to research items in greater detail before I plan them I will just write dot points.
As the lessons start to come together I will refer to the teaching and learning strategies I have at the top of the planner to ensure I am using a wide range. If I am stuck for how to deliver a lesson I will also look at the strategies to spark ideas. 


I then write up the resources I need to source or create and begin to make them. I prefer to use PowerPoint to design my resources because of how easy it is to move images and text boxes. Sometimes while I am creating the resources I will have better ideas or something I though would work didn't and I will go back to my planner and tweak.


So that's my design process. I hope you have gotten some ideas to help with your own planning.

I have heaps of resources in my store that are great additions to units or let me do all the hard work for you and download one of my complete units instead.
HASS Resources | HASS units | English Resources| English Units| Health Units| Science Units
Like us on Facebook Follow us on Pinterest

Tuesday, 7 March 2017

How to Make Time for Everything


I regularly get asked how do I have time for everything- I work full time as a classroom teacher, have two toddlers and run the MrsAmy123 business. 


The truth?


I don't!

In everything we do in life there will never be enough time to do everything! There is always more we could or should do. When we learn to accept the fact we can not do it all we can become much more at peace. Learn to forgive yourself if you don't get EVERYTHING done!

Some days it gets me down that I didn't do this or that and sometimes it keeps me awake at night. Its only human!

So now that we are all probably feeling a bit down with that notion lets move on to how I better manage the time I do have.


The first thing is to have priorities!
 What ranks highest on your list? Where does everything else factor in?


For me, my family is the most important thing in my life and they will always come first. But as a teacher I have responsibilities and set hours. So what I decided was while I am at work I get as much as I can done and arrive and leave within half an hour of my students. When I am home and my kids are awake my time is dedicated to them first. When they are asleep the time is mine for me (and sometimes my husband ;-) ) and I usually choose to work on my business because that's my hobby, that's what I enjoy doing. So every now and again I will do school work at home but it is not the norm and other than the first two weeks back each year it doesn't happen more than 1-2 times a week.

Next is getting systems in place to help with everything! For me that's routines.

Planner:
I was really excited to start using a planner this year to help me manage everything. I decided to take the plunge and get an Erin Condren. They are not cheap, but they are aesthetically pleasing and the style really works for the way my head thinks- three sections for each day which match up perfectly with my top three priorities- family, school and my business. Having a planner keeps me on track and motivated to be productive. Nothing is worse then forgetting about something and having to rush it at the last minute or wasting your time trying to think about what you need to do.
No automatic alt text available.


School:
 I get up at 6 and get myself and my family ready for the day and then (after a 25 minute drive) arrive at 8 am in the morning (mainly to guarantee good parking otherwise I would probably get there later). The students are allowed in at 8:30 and official teaching time begins at 8:40. Unless I have duty I force myself to go to the staff room at recess to debrief and build relationships with the staff. Unless I have duty, I take a working lunch. I eat as I prepare whatever I need to to. During my DOTT sessions (duties other than teaching) I make sure to maximise my time. You can read more on that by clicking here. 

Home Time:
As soon as my girls are in bed around 7pm I start working on my business until I feel ready for bed.
My husband and I like having a tidy home so we found a cleaning routine that worked best for us. After our tea he takes our girls for their bath/shower while I clean for 10-20 minutes. Each night I have something different to do on a fortnightly cycle. You can never have a completely tidy house with two toddlers but this routine keeps things live-able. I usually have time to squeeze in a shower and a quick 15 minute workout before I start work on my business.

Weekends:
I work during my youngest daughters nap time on the weekend and usually manage to squeeze some other time in for the business but the majority of the weekend is spent with my family.

Don't stretch yourself to thin!
Don't be the teacher that is constantly running around in a panic stricken state with a to do list longer then the Titanic. We all know a teacher like this (or maybe that's you)! They don't have their priorities in order as we spoke about before, but they are also usually stretching themselves way to thin! Don't take on more responsibilities if you're struggling with the ones you have.
We were once asked to start two new programs in our class at the start of the year with a fairly large learning curve. I implemented one in the most basic way I could and focused all my attention of making the other one big and great. After I was satisfied with how that one was running and my knowledge of it I went on to conquer the other one. To try implement them to both at the same time was unmanageable and they would have been half- hearted and probably fallen into a heap.
With two young children at home I am also not jumping on board any extra projects at school. When my girls are older then I will devote more time to school and get back into those extra thing.

Make time for yourself:
Looking after yourself is fundamental to being a good teacher for the long hall. Get sleep! Have fun! Spend time on something you LOVE! When we are happy, well rested and enjoying life we are more productive!


My last tip is to work around your strengths and weaknesses.
My teaching strength is in planning. I love making up fun, engaging units that involve collaboration. If planning isn't your strong suit then let me help you out to give you more time to be the excellent teacher you are!
Shop my store full of ready to use units by clicking here.

I have heaps of other ideas to help your maxmise your time at school that I will share in future blogs. Don't forget to check out my blog article on maximising your planning time.
Like us on Facebook Follow us on Pinterest

Friday, 24 February 2017

Teaching Vocabulary

Want some ideas for implementing a vocabulary program? Read on (and stay tuned till the end for a FREEBIE!) 


During a PD sessions I attended once, a leading teaching spoke about teaching vocabulary and how she felt it had been the main reason her school had had an increase in their schools NAPLAN results (Australia's standardized testing) and had made a dramatic difference in both their reading and writing. 
Our principal then tasked us with trying this in our classrooms.....I tried it her way....then started tweaking it as I didn't find the time she spent on it (30 minutes to an hour every day!) worth the results I was getting in my classroom.


Through trial and error this is the way I would now teach vocabulary to year 3's and above. 
I decreased the amount of words I was expecting my students to learn to only 24 a week. Practice each day only takes about 15 minutes. The activities also integrate other reading and writing skills as much as possible to maximize the effectiveness of the time spent.

Monday:
Teacher reads through list and students echo back.
Teacher reads list again while students rate each word (Ratings Poster) in the square box before each word.
Teacher reads through the list and defines each word calling on students to assist for some words.
Students read through the list with the teacher as quickly as possible.


Tuesday:
Teacher holds up flash cards one at a time and students read each word. Occasionally define a word.
Students complete activity.
Students make a bracelet for one of the words they ranked a ‘2’ in previous days activity and must use that word as many times as possible that day.
(An example of an activity- definition match)


Wednesday:
Teacher holds up flash cards one at a time and students read each word. Occasionally define a word.
Students complete activity sheet.

Early finishers can time each other to see how quickly they can read through the list.


(An example of a worksheet- simple but aids in their understanding)

Thursday:
Teacher holds up flash cards one at a time and students read each word. Go over the definitions of some of the words.
Students play selected games from the suggested games.

Friday:
Students write for ten minutes seeing how many times they can use the words from the list. The amount of words used correctly can be recorded for assessment purposes. Weaker writers could do this task verbally.
Extras:
It is recommended when reading through the words that you do so in a tone or manner that helps depict the meaning of the word. This makes it more memorable and students will be more likely to remember them.
Every time students do a writing task, challenge them to use the words in their work. Each time they use a word correctly place a tick in the star on their word list sheet. Give certificates or rewards for certain amounts used or a whole sheet.
Have students complete the focus word sheet for 3 words they have ranked a ‘3’ or ‘4’. 

I am currently teaching year 1's and had no plan of doing vocabulary with them....but then I changed my mind. I try and do a word of the day whenever we get a spare 5 minutes during out morning block.

During a 30 minute afternoon session we go through one of the lists, saying and defining the words. We swap lists every two weeks and our word of the day is selected from this list. The first list we did was words that all meant happy and we have moved on now to weather words which fits in with our HASS and Health unit.

Here are a few games you can play with vocabulary words:


Celebrity Heads: Have students randomly select a word from the list and attach it to a paper band around their head. Students can ask yes and no questions to try and work out their word. Questions should focus on meaning more than the spelling of their word. Make it more challenging by not allowing them to use the list of words for reference.  Play with 5 students selected in front of the class or have all students wandering around.

Memory: Give pairs of students two copies of 10-15 of the words. Lay them all face down spread out on the ground. Students take turns turning two of them over at a time. If they get two matching words they get another turn. The students with the most matching words win.

Quick!: Individually, in pairs or as a group have students write as many of the words that they can remember of the list as possible. The students/s with the most correct words win. Ensure time is given to identify the words they missed.

Charades: Students act out a word and the rest of the class/group/partner must guess it.

Pictionary: Students try and draw a word and the rest of the class/group/partner must guess it.


Taboo: Students given verbal hints to a word and their partner/group/class must try and guess it.

Word Cline: Sort the words from the two extremes e.g. from the biggest word for biggest to the smallest word for smallest.

Categories: Sort the words into different categories such as negative/postive or parts of speech (verbs, adverbs, nouns, adjectives, other).

Here is a FREE Vocabulary pack if you would like to try this approach for two weeks:

I have a years worth of vocabulary packs for a range of topics in my stores or you can get them for a great discount in this Year Long Vocabulary Bundle!


Like us on Facebook Follow us on Pinterest